
Data Cleaning and Validation in Machine Learning: A Step-by-Step Framework
A practical framework for cleaning and validating machine learning data — when to correct, complete, standardize, or remove records, and how to confirm your cleaning actually worked.
Why Diagnosis Alone Isn’t Enough
In the last post, we talked about Data Quality Assessment Data Quality Assessment — how to look at a dataset and figure out what’s actually wrong with it. Missing values, mislabeled records, duplicates, inconsistent formats, invalid entries — we learned how to spot all of it and put it down in a quality report.
But here’s the thing: spotting a problem and fixing a problem are two completely different skills.
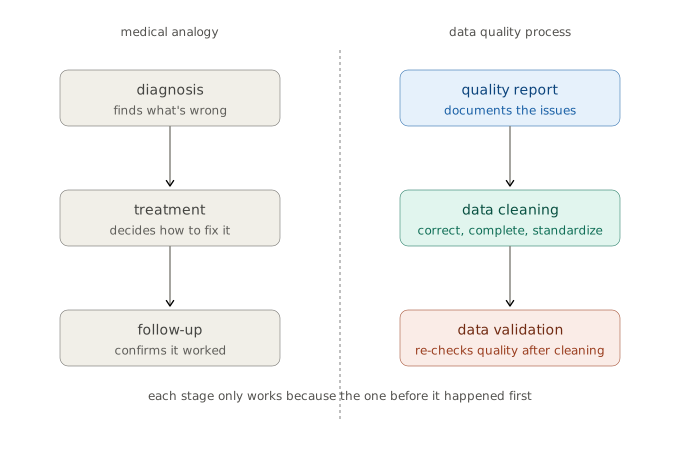
Think about it like going to the doctor. The doctor runs some tests, looks at the results, and tells you what’s wrong. That’s the diagnosis. But the diagnosis itself doesn’t make you better — you still need treatment, and afterward, a follow-up to confirm it actually worked.
Data works exactly the same way.
- The quality report is the diagnosis — it tells you what’s wrong.
- Data cleaning is the treatment — it decides how to fix things.
- Data validation is the follow-up — it confirms the treatment actually worked.
This post is about the last two parts: cleaning and validation. Together, they’re what turn a messy, unreliable dataset into something you can actually trust enough to build a model on.
So What Exactly Is Data Cleaning?
Here’s a definition that’s a little broader than what most people expect:
Data cleaning is the process of correcting, completing, standardizing, or removing the issues that your quality assessment uncovered.
Now, notice what’s missing from that definition. It doesn’t say “deleting bad rows.” It doesn’t say “filling in every blank.” It doesn’t say “use this one technique for everything.”
That’s because data cleaning isn’t really about deleting or fixing on autopilot — it’s about making thoughtful decisions. Every choice you make should improve the reliability of your data while keeping as much useful information intact as possible. If you clean a dataset down to nothing, you haven’t really cleaned it — you’ve just thrown most of it away.
Assessment and Cleaning Are Two Halves of the Same Process
It helps to think of assessment and cleaning not as separate, standalone tasks, but as two stages in one continuous flow:
Raw Data → Assessment → Quality Report → Cleaning → Validation → ML-Ready Dataset
Assessment finds the problems. Cleaning fixes them. Validation checks that the fix actually held up. Skip any one of these, and the whole chain gets weaker — clean without assessing first, and you’re guessing. Assess without cleaning, and you’ve just made a list of complaints. Clean without validating, and you’re trusting changes you never actually verified.
One Question to Guide Every Cleaning Decision
No matter what kind of data you’re working with — spreadsheets, images, audio, text, sensor readings — every cleaning decision really comes down to one question:
What’s the best action here that improves quality without throwing away useful information?
You don’t need to memorize a giant list of cleaning tricks. What you actually need is a way of thinking through each issue, step by step.
Step 1: Is It Actually Wrong?
Not every strange-looking value is an error. A CEO with a ten-million-dollar salary looks like an outlier, but it might be completely real. A patient with an unusually rare condition might look like a data entry mistake — but deleting that record could quietly make your model worse at recognizing rare but real cases.
Before you touch anything, ask yourself: is this rare, or is it actually wrong? Those are not the same thing, and mixing them up is one of the most common cleaning mistakes.
Step 2: Can It Be Corrected?
If you have reliable information to fix the issue, correcting it is almost always your best move, because it keeps the record intact. This covers things like fixing a typo, correcting a wrong label, repairing a broken format, or converting mismatched units. A correction is a clean win — you lose nothing and gain accuracy.
Step 3: Can It Be Completed?
Sometimes the problem isn’t that something is wrong — it’s that something is simply missing. Rather than tossing the whole record out, see if you can fill the gap using a trustworthy method: estimating a missing value, recovering missing metadata, or reconstructing an incomplete record. Completing data this way often saves samples you’d otherwise lose for good.
Step 4: Can It Be Standardized?
When data comes from multiple sources, the same piece of information often shows up in different shapes — different date formats, different units, different category names, different image sizes, different audio sample rates. None of this data is wrong, exactly; it’s just inconsistent. Standardizing it brings everything onto the same footing so your model isn’t accidentally treating “USD” and “$” as two different things.
Step 5: Should It Just Be Removed?
Removal should be your last resort, not your first instinct. Only remove a record when it genuinely can’t be trusted, can’t be corrected, can’t be completed, and would do more harm than good by sticking around. Every record you delete is information you’re permanently giving up — so make sure that trade-off is actually worth it.
The Small Set of Actions Behind Every Cleaning Task
Even though datasets can look wildly different from each other, almost every cleaning operation falls into one of these buckets:
| Action | What It Does |
|---|---|
| Correct | Fixes something that’s wrong |
| Complete | Fills in something that’s missing |
| Standardize | Makes inconsistent formats consistent |
| Merge | Combines duplicate records into one |
| Remove | Eliminates data that simply can’t be used |
| Reconstruct | Recovers damaged or corrupted information where possible |
| Document | Keeps a record of what was done and why |
Whether you’re fixing a customer’s birthdate or relabeling a mislabeled image, the action you’re taking almost always fits into one of these seven categories.
The Same Logic, Different Data Types
Here’s the part that tends to surprise people: the thinking behind cleaning doesn’t change based on what kind of data you’re working with. Only the execution does.
| Issue | Tabular Data | Images | Text | Audio | Time Series |
|---|---|---|---|---|---|
| Missing info | Fill or remove values | Recover or drop missing images | Recover or drop missing documents | Recover recordings or transcripts | Fill in missing timestamps/readings |
| Incorrect info | Correct values | Correct labels | Correct annotations | Correct transcripts | Correct sensor readings |
| Inconsistent format | Standardize formats | Standardize resolution/color | Normalize encoding | Standardize sample rate | Standardize time zone/frequency |
| Invalid data | Correct or remove | Remove corrupted files | Fix invalid encoding | Remove corrupted audio | Remove impossible readings |
| Duplicates | Merge or remove | Remove duplicate images | Remove duplicate documents | Remove duplicate recordings | Remove duplicate timestamps |
Notice the pattern: the column headers change, but the row labels — the actual decisions — stay the same. That’s the whole point. Once you internalize the decision framework, you can apply it to a CSV file just as easily as you can to a folder of audio clips.
Cleaning Is a Decision Process, Not a Tool
A lot of tutorials jump straight into code — “here’s how to drop nulls in Pandas,” “here’s an OpenCV snippet to fix image resolution.” But that’s putting the cart before the horse.
The real order of operations should be:
- Understand what’s actually wrong.
- Decide on the right action (correct, complete, standardize, merge, remove, or reconstruct).
- Pick a technique that fits.
- Only then, implement it with whatever tool makes sense — Pandas, SQL, OpenCV, Librosa, Spark, whatever fits the job.
The tools will keep changing as the field evolves. The reasoning behind your decisions shouldn’t.
Why You Should Document Everything
Picture this: you open a project six months from now and notice that thousands of records are just… gone. Who removed them? Why? What rule justified it?
If you didn’t write any of that down, you have no way to answer those questions — and neither does anyone else on your team.
For every cleaning operation, it’s worth jotting down:
- What was changed
- Why it was changed
- What rule or reasoning justified the decision
- How many records were affected
- Whether the change actually improved things
This isn’t busywork. It’s what makes your cleaning process reproducible and trustworthy instead of a black box that nobody — including future you — can explain.
Cleaning Isn’t the Finish Line
A lot of people assume that once the cleaning script runs without errors, the job is done. It isn’t. You still need to check that what you did actually worked — and that’s where data validation comes in.
Data validation answers one question: did the cleaning process actually improve the data, without quietly introducing new problems?
In practice, validation is just a second round of quality assessment — except this time, you’re comparing the dataset before and after cleaning, side by side:
Assessment → Cleaning → Validation
What Validation Should Actually Check
A properly cleaned dataset should hold up against a short checklist:
- Are missing values actually resolved?
- Are duplicates properly handled?
- Are formats now consistent across the board?
- Are invalid records corrected or removed as intended?
- Do the original quality rules now pass?
- Has useful information been preserved, not stripped away?
- Is the dataset still representative of the real-world problem you’re solving?
If your cleaning process technically “ran” but quietly deleted half your minority class or flattened out important variation, that’s not successful cleaning — that’s a different problem dressed up as a fix. Validation is what catches that before it becomes a model that fails silently in production.
The Full Picture
Put together with the previous post, here’s the complete lifecycle:
Data Collection → Assessment → Quality Report → Cleaning → Validation → ML-Ready Dataset
Skip assessment, and you’re cleaning blind. Skip cleaning, and known problems just sit there untouched. Skip validation, and you’re trusting fixes you never actually checked. Each stage leans on the one before it — that’s not optional structure, it’s the whole point.
A Few Myths Worth Retiring
“Cleaning means deleting bad data.” Not really. Correcting and standardizing usually beat deleting — removal should be your last option, not your default.
“Every missing value needs to be filled in.” Sometimes removing the record makes more sense. Sometimes leaving the gap as-is is the right call. It depends entirely on the context.
“One cleaning method works for any dataset.” The techniques change by data type. The decision-making framework behind them doesn’t.
“Cleaning is done once the code runs without errors.” Cleaning is done once validation confirms the data actually got better — not a moment before.
What’s Next
At this point, we’ve covered the full arc: what makes data trustworthy, how to assess it, how to decide on the right cleaning action, and how to confirm the fix actually worked. And the best part is, this framework doesn’t change whether you’re working with spreadsheets, images, text, audio, video, or time series.
From here, the next posts will stop talking in theory and start getting hands-on — walking through assessment, cleaning, validation, preprocessing, EDA, and feature engineering for each data type individually, using the actual tools that fit the job.
The thinking stays the same throughout. Only the implementation changes.